
Below is a clear, structured, and detailed discussion of Deploying a Struts Application with Database Connectivity, explained step-by-step with a practical example, in the same academic–technical style as earlier answers.
Deploying a Struts Application with Database Connectivity
Introduction
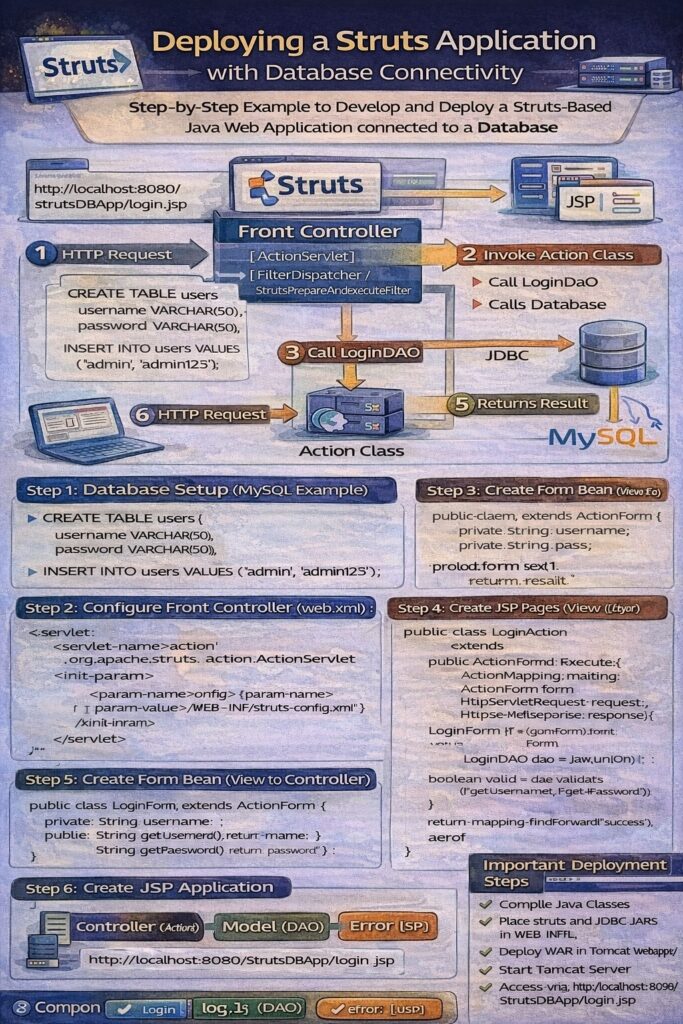
Deploying a Struts application with database connectivity involves configuring the MVC components, establishing a connection between the application and the database, and deploying the application on a web container such as Apache Tomcat. In a Struts-based application, database interaction is handled in the Model layer, while the Controller manages request flow and the View displays results.
Overall Architecture Flow
- User sends request from browser
- Request reaches Struts Front Controller
- Action class processes the request
- Action class calls Model (DAO)
- DAO interacts with database
- Result returned to Action class
- Action forwards response to JSP
- JSP displays output to user
Prerequisites for Deployment
- JDK installed
- Apache Tomcat server
- Database (MySQL / Oracle / PostgreSQL)
- JDBC Driver
- Struts libraries (
struts.jar,commons-*, etc.)
Project Structure (Struts 1 Example)
StrutsDBApp/
│
├── src/
│   ├── com.app.action/
│   │   └── LoginAction.java
│   ├── com.app.form/
│   │   └── LoginForm.java
│   └── com.app.dao/
│       └── LoginDAO.java
│
├── WebContent/
│   ├── login.jsp
│   ├── success.jsp
│   ├── error.jsp
│   └── WEB-INF/
│       ├── web.xml
│       └── struts-config.xml
Step 1: Database Setup
Example: MySQL Table
CREATE TABLE users (
    username VARCHAR(50),
    password VARCHAR(50)
);
Insert sample data:
INSERT INTO users VALUES ('admin', 'admin123');
Step 2: Configure Struts Front Controller
web.xml
<web-app>
    <servlet>
        <servlet-name>action</servlet-name>
        <servlet-class>
            org.apache.struts.action.ActionServlet
        </servlet-class>
        <init-param>
            <param-name>config</param-name>
            <param-value>/WEB-INF/struts-config.xml</param-value>
        </init-param>
        <load-on-startup>1</load-on-startup>
    </servlet>

    <servlet-mapping>
        <servlet-name>action</servlet-name>
        <url-pattern>*.do</url-pattern>
    </servlet-mapping>
</web-app>
Step 3: Struts Configuration
struts-config.xml
<struts-config>

    <form-beans>
        <form-bean name="loginForm"
                   type="com.app.form.LoginForm"/>
    </form-beans>

    <action-mappings>
        <action path="/login"
                type="com.app.action.LoginAction"
                name="loginForm"
                input="/login.jsp">
            <forward name="success" path="/success.jsp"/>
            <forward name="error" path="/error.jsp"/>
        </action>
    </action-mappings>

</struts-config>
Step 4: Form Bean (View to Controller)
LoginForm.java
public class LoginForm extends ActionForm {
    private String username;
    private String password;

    public String getUsername() { return username; }
    public void setUsername(String username) {
        this.username = username;
    }

    public String getPassword() { return password; }
    public void setPassword(String password) {
        this.password = password;
    }
}
Step 5: DAO Class (Model – Database Logic)
LoginDAO.java
import java.sql.*;

public class LoginDAO {

    public boolean validate(String user, String pass) {
        boolean status = false;
        try {
            Class.forName("com.mysql.cj.jdbc.Driver");
            Connection con = DriverManager.getConnection(
                "jdbc:mysql://localhost:3306/testdb",
                "root", "root");

            PreparedStatement ps =
                con.prepareStatement(
                "SELECT * FROM users WHERE username=? AND password=?");

            ps.setString(1, user);
            ps.setString(2, pass);

            ResultSet rs = ps.executeQuery();
            status = rs.next();

            con.close();
        } catch (Exception e) {
            e.printStackTrace();
        }
        return status;
    }
}
Step 6: Action Class (Controller Logic)
LoginAction.java
import javax.servlet.http.*;
import org.apache.struts.action.*;
import com.app.dao.LoginDAO;
import com.app.form.LoginForm;

public class LoginAction extends Action {

    public ActionForward execute(
        ActionMapping mapping,
        ActionForm form,
        HttpServletRequest request,
        HttpServletResponse response) {

        LoginForm lf = (LoginForm) form;
        LoginDAO dao = new LoginDAO();

        boolean valid = dao.validate(
            lf.getUsername(), lf.getPassword());

        if (valid)
            return mapping.findForward("success");
        else
            return mapping.findForward("error");
    }
}
Step 7: JSP Pages (View Layer)
login.jsp
<html>
<body>
<form action="login.do" method="post">
    Username: <input type="text" name="username"><br>
    Password: <input type="password" name="password"><br>
    <input type="submit" value="Login">
</form>
</body>
</html>
success.jsp
<h2>Login Successful</h2>
error.jsp
<h2>Invalid Username or Password</h2>
Step 8: Deployment Steps
- Compile Java classes
- Place
.classfiles inWEB-INF/classes - Place Struts and JDBC JARs in
WEB-INF/lib - Deploy project in Tomcat
webappsfolder - Start Tomcat server
- Access application via browser
http://localhost:8080/StrutsDBApp/login.jsp
Advantages of Using Struts with Database
- Clear separation of concerns
- Centralized request handling
- Reusable DAO components
- Secure database access using JDBC
- Easy maintenance and scalability
Common Issues During Deployment
- Missing JDBC driver JAR
- Incorrect database URL or credentials
- Wrong action mapping
- ClassNotFoundException
- Incorrect servlet mapping
Conclusion
Deploying a Struts application with database connectivity involves integrating the MVC architecture, configuring the front controller, implementing Action classes, and connecting the Model layer to the database using DAO and JDBC. This approach ensures a clean separation of responsibilities, secure data handling, and a scalable enterprise-ready web application structure.